

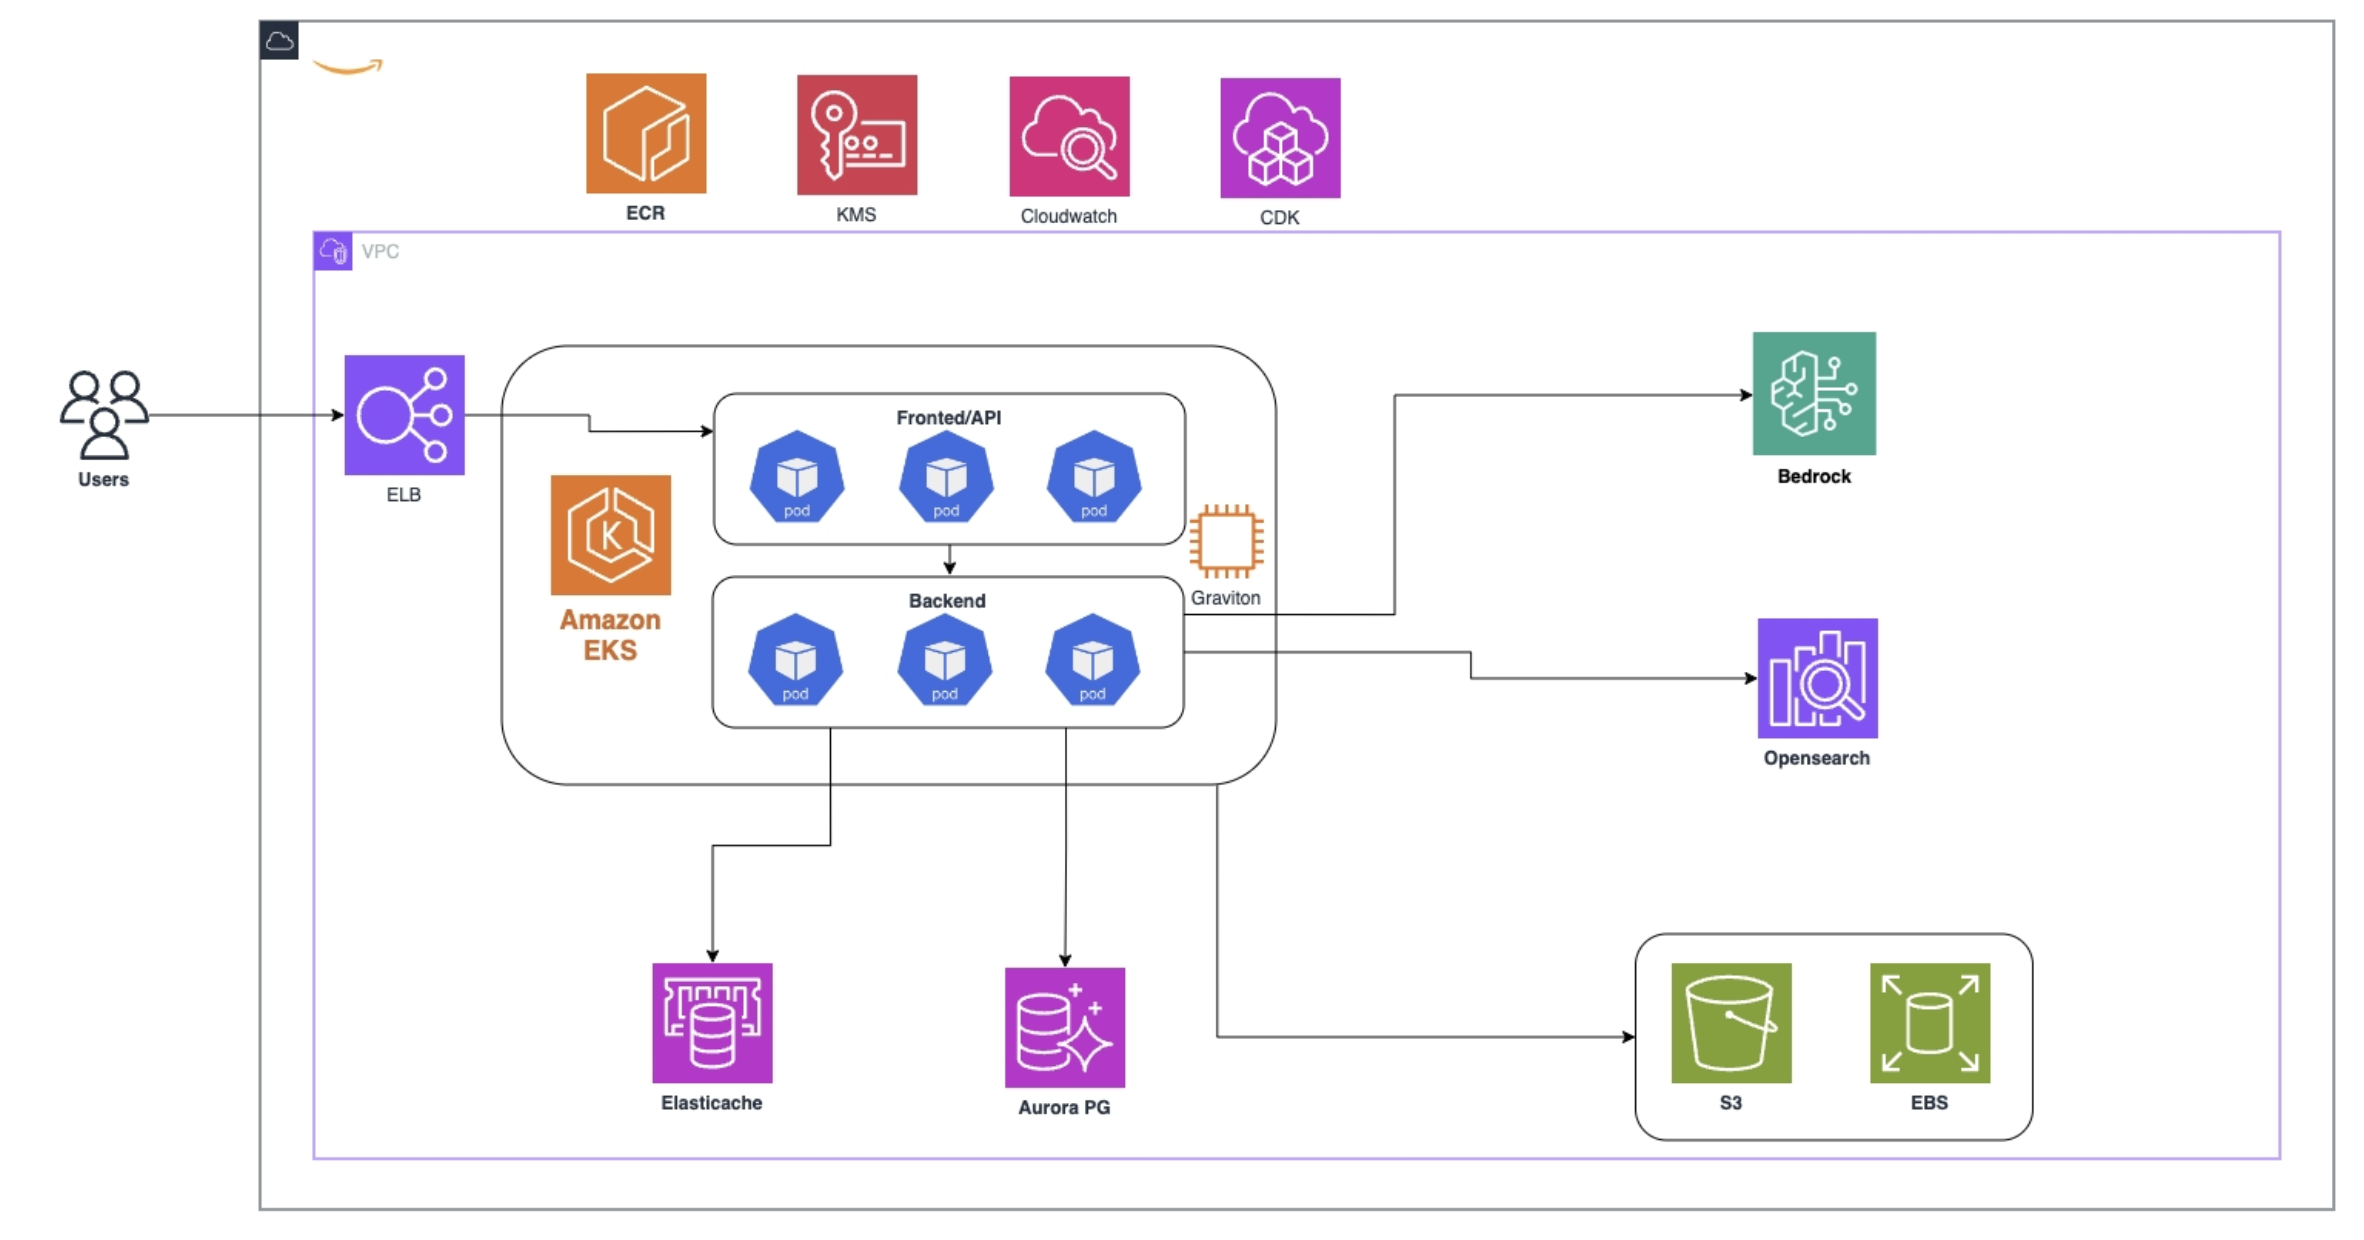
Components
Testing Deployment
Production Deployment
Deployment
The whole process is expected to take 60 mins
-
Configure AWS CLI:
Install and configure the AWS CLI: -
Clone this repository:
-
Install NodeJS Dependencies:
-
Configure environment variables:
Modify the environment variable values in the.envfile.-
ENVIRONMENT: Specifies the deployment environment; must be eithertestorprod. -
CDK_DEFAULT_REGION: The AWS region where Dify Enterprise will be deployed. -
CDK_DEFAULT_ACCOUNT: Your AWS account ID. -
DEPLOY_VPC_ID: The ID of an existing VPC for deployment. If not set, CDK will create one for you. -
Note: If using an existing VPC
- Make sure you have 2 or more public subnets for Application Load Balancer, and 2 or more private subnets can access internet(associated with NAT) to pull docker image from internet.
-
Add Tag for the subnets(Otherwise, Step 6 will show WARN about auto-tag failed, which will result in the Application Load Balancer failing to be created successfully.):
-
Subnets Configuration (
DEPLOY_VPC_IDrequired, comma-separated without spaces, private subnets is recommended by AWS security best practices):EKS_CLUSTER_SUBNETS: Subnet IDs for the EKS control plane. Requires at least 2 subnets in different Availability Zones (AZs).EKS_NODES_SUBNETS: Subnet IDs for the EKS worker nodes. Requires at least 2 subnets in different AZs.REDIS_SUBNETS: Subnet IDs for Redis deployment.RDS_SUBNETS: subnet ids for RDS database. (At least 2 with different AZs)OPENSEARCH_SUBNETS: Subnet IDs for OpenSearch deployment.OPENSEARCH_ADMINNAME: OpenSearch Domain master ame.OPENSEARCH_PASSWORD: OpenSearch Domain master password.
-
AWS_EKS_CHART_REPO_URL: (For AWS China regions ONLY) The AWS EKS Helm chart repository URL. -
RDS_PUBLIC_ACCESSIBLE: Set totrueto make RDS publicly accessible (NOT RECOMMENDED).
- If you are using AWS China regions, you must configure the
AWS_EKS_CHART_REPO_URLfor proper functionality. Please contact Dify Team for the URL. - It is recommended to use an existing VPC for easier resource access.
-
-
CDK Bootstrap:
Initialize the CDK environment: -
CDK Deploy:
-
Deploy Dify Enterprise:
-
Deploy Dify Enterprise:
-
Update AWS EKS Access Permissions:
- Navigate to the EKS Cluster panel, select the “Access” menu, and click on “Manage access”:

- In the “Manage access” dialog, select “EKS API and ConfigMap,” then click “Save Changes.”
- In the IAM Access Entries panel, click “Create access entry”:

- Add your IAM user and assign the following permissions:
AmazonEKSAdminPolicyAmazonEKSAdminViewPolicyAmazonEKSClusterAdminPolicy
-
Configure
kubeconfigto access the Kubernetes (K8S) cluster locally:Adjust theregionandnameparameters according to your deployment:- region: The AWS region where your cluster is deployed.
- name: The EKS cluster name .
-
Data Persistence Configure:
Change the Helmvalues.yamlfile. To enable it, modify thepersistencesection as follows, replace{your-region-name}and{your-s3-bucket-name}with the name of resource created by CDK, make sure you have turnuseAwsManagedIamon: -
Database Configure:
Change the Helmvalues.yamlfile, removepostgresection, and modify theexternalPostgressection as follows, replace{your-postgres-endpoint}and{your-postgres-password}with data stored in the Secret Manager of AWS: -
Redis Configure:
Change the Helmvalues.yamlfile, removeredissection, and modify theexternalRedissection as follows, replace{your-redis-host}withPrimary endpointin console of ElastiCache-Redis OSS caches Note: remove the port number of thePrimary endpoint -
VectorDatabase Configure:
Change the Helmvalues.yamlfile, modify theexternalTypesection as follows:- replace
{openSearch_endpont}with aws Opensearch instant’s Domain endpoint, removehttps://and use the left. - replace the
<OPENSEARCH_ADMINNAME>and<OPENSEARCH_PASSWORD>with the value you have set in.env
- replace
-
Set docker image pull secret
You need to set the docker image pull secret before installing Dify Enterprise. Note: If you haven’t got the username and password, please contact us, email address:Support@dify.ai -
TLS
For testing:
If you are just testing the deploy process, you can just ignore this step and go on.For production:
Go to AWSACMto require the certificates of the domain you declared in helm chart configuration filevalues.yaml:they are:go to your domain service provider (e.g. cloud flare, aws route53, etc.) and setup thecnameto prove your ownership of these domains. change the values.yaml param: global.useTLS -
AWS Load Balancer Configuration
It is recommended to use an AWS Application Load Balancer (ALB) for your ingress configuration in the Helmvalues.yamlfile. To enable it, modify theingresssection as follows: For testing:For production: refer to: AWS load balancer controller setup -
Install Dify Enterprise
Dify Enterprise is deployed using Helm. -
Access Dify Enterprise
For testing:
After setting up, get the temperally external IP of the ALB.Then add the following line to your/etc/hostsfile.For production
Go to your Domain service provider, and set up DNS to the ALB address(Go to AWS-EC2-Load Balancer to get the dns of alb): -
Verify Installation
Warning: You have to set up Dify Consolehttp://console.dify.localfirst before login to Dify Enterprise Dashboardhttp://enterprise.dify.local.-
Dify Console: visit
http://console.dify.localand finish the installation. -
Enterprise Dashboard: visit
http://enterprise.dify.local, and login with the default email and password. You can change the password after login.
-
Dify Console: visit
Destroy
The process may take 20 mins.Destroy the deployment for the environment specified in the
.env file under ENVIRONMENT.
Cloudformation and perform the deletion operation.