> ## Documentation Index
> Fetch the complete documentation index at: https://enterprise-docs.dify.ai/llms.txt
> Use this file to discover all available pages before exploring further.
# Plugin Trigger
## Introduction
Triggers are available for Workflow applications only.
A plugin trigger automatically initiates your workflow when a specific event occurs in an external system. All you need to do is subscribe to these events through a trigger plugin and add the corresponding plugin trigger to your workflow.
For example, suppose you have installed a GitHub trigger plugin. It provides a list of GitHub events you can subscribe to, including `Pull Request`, `Push`, and `Issue`. If you subscribe to the `Pull Request` event and add the `Pull Request` plugin trigger to your workflow, it will automatically run whenever someone opens a pull request in the specified repository.
## Add and Configure a Plugin Trigger
1. On the workflow canvas, right-click and select **Add Node** > **Start**, then choose the plugin trigger event you want to start the workflow. To find more trigger plugins, search the [Marketplace](https://marketplace.dify.ai/?language=en-US\&category=trigger).
* If no trigger plugin exists for your target system, [request one](https://github.com/langgenius/dify-plugins/issues/new?template=plugin_request.yaml), [build one yourself](https://docs.dify.ai/en/develop-plugin/dev-guides-and-walkthroughs/trigger-plugin), or use a [Webhook Trigger](/en/3.7.x/use/nodes/trigger/webhook-trigger) instead.
* A workflow can have multiple plugin triggers. If their branches share downstream nodes, add a [Variable Aggregator](/en/3.7.x/use/nodes/variable-aggregator) to converge them.
2. Select an existing subscription or [create a new one](#create-a-subscription). The trigger needs a subscription to receive events.
View how many workflows are using a specific subscription from the plugin's details panel under **Plugins**.
3. Configure any other required settings.
The output variables of a plugin trigger are defined by its trigger plugin and can't be modified.
## Create a Subscription
A subscription is a webhook that listens for events from an external system. Each trigger plugin supports up to 10 subscriptions per workspace.
A webhook lets one system send real-time data to another. When an event occurs, the source system packages the details into an HTTP request and sends it to a URL the destination system provides.
**Prerequisite: set the callback URL base**
Dify builds each subscription's callback URL from the `TRIGGER_URL` environment variable plus a plugin-specific path. The default `http://localhost:5001` is unreachable by external systems, so set `TRIGGER_URL` to a public domain or IP they can reach, then restart Dify before creating subscriptions.
Dify supports two ways to create a subscription, depending on what the plugin supports.
* **Automatic**: You pick the events to subscribe to, and Dify creates the webhook in the external system for you. This requires prior authorization, through OAuth or an API key, so Dify can set it up on your behalf.
* **Manual**: You create the webhook yourself using the callback URL Dify provides. No authorization needed.
1. Select **Create with OAuth** > **Custom**.
2. In the external system, create an OAuth application using the callback URL Dify provides.
3. Back in Dify, enter the application's client ID and client secret, then click **Save and Authorize**.
Once saved, the same credentials can be reused for future subscriptions.
4. Name the subscription, select the events to subscribe to, and configure any other required settings.
Subscribe to all available events. A trigger only fires for events its subscription covers, so a broad subscription can be reused by any trigger you add later instead of creating new ones.
5. Click **Create**.
1. Select **Create with API Key**.
2. Enter the required authentication details, then click **Verify**.
3. Name the subscription, select the events to subscribe to, and configure any other required settings.
Subscribe to all available events. A trigger only fires for events its subscription covers, so a broad subscription can be reused by any trigger you add later instead of creating new ones.
4. Click **Create**.
1. Select **Paste URL to create a new subscription**.
2. Name the subscription and use the callback URL Dify provides to create a webhook in the external system.
3. (Optional) Test it: trigger a subscribed event, then check the **Request Logs** at the bottom of the **Manual Setup** page for the received request and Dify's response.
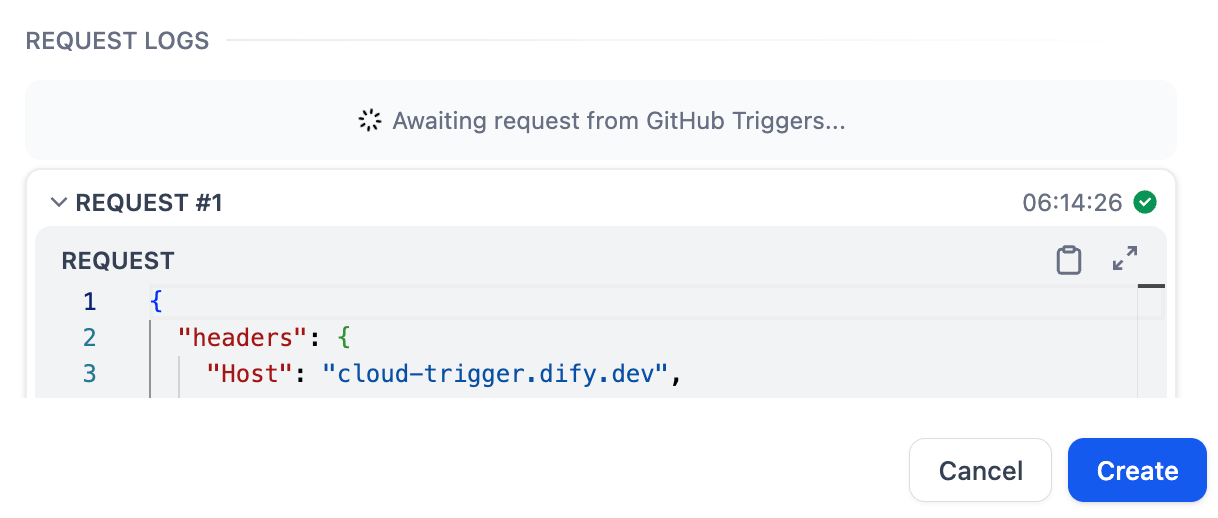 4. Click **Create**.
## Test a Plugin Trigger
To test an unpublished plugin trigger, you must first click **Run this step** or test-run the entire workflow. This puts the trigger into a listening state so that it can monitor external events. Otherwise, the trigger will not capture subscribed events even when they occur.
4. Click **Create**.
## Test a Plugin Trigger
To test an unpublished plugin trigger, you must first click **Run this step** or test-run the entire workflow. This puts the trigger into a listening state so that it can monitor external events. Otherwise, the trigger will not capture subscribed events even when they occur.