> ## Documentation Index
> Fetch the complete documentation index at: https://enterprise-docs.dify.ai/llms.txt
> Use this file to discover all available pages before exploring further.
# Model Providers
> Configure AI model access for your workspace, the foundation that powers all your applications
Model providers give your workspace access to AI models. Every application you build needs models to function, and configuring providers at the workspace level means all team members can use them across all projects.
You configure model providers by adding your own API keys for services like OpenAI, Anthropic, Google, and others. You get full control and direct billing through each provider.
## Configure Providers
Only workspace admins and owners can configure model providers. The process is consistent across providers:
Access the model provider configuration in your workspace settings.
Choose from OpenAI, Anthropic, Google, Cohere, or other supported providers.
Enter your API key and any additional configuration required by the provider.
Dify validates your credentials before making the provider available to your workspace.
## Supported Providers
**Large Language Models**:
* OpenAI (GPT-4, GPT-3.5-turbo)
* Anthropic (Claude)
* Google (Gemini)
* Cohere
* Local models via Ollama
**Embedding Models**:
* OpenAI Embeddings
* Cohere Embeddings
* Azure OpenAI
* Local embedding models
**Specialized Models**:
* Image generation (DALL-E, Stable Diffusion)
* Speech (Whisper, ElevenLabs)
* Moderation APIs
## Provider Configuration Examples
**Required**: API Key from OpenAI Platform
**Optional**: Custom base URL for Azure OpenAI or proxies, Organization ID for organization-scoped usage
**Available Models**: GPT-4, GPT-3.5-turbo, DALL-E, Whisper, Text embeddings
**Required**: API Key from Anthropic Console
**Available Models**: Claude 3 (Opus, Sonnet, Haiku), Claude 2.1, Claude Instant
**Required**: Ollama server URL (typically [http://localhost:11434](http://localhost:11434))
**Setup**: Install Ollama, pull models (`ollama pull llama2`), configure Dify connection
**Benefits**: Complete data privacy, no external API costs, custom model fine-tuning
## Manage Model Credentials
Add multiple credentials for a model provider's predefined and custom models, and easily switch between, delete, or modify these credentials.
Here are some scenarios where adding multiple credentials is particularly helpful:
* **Environment Isolation**: Configure separate model credentials for different environments, such as development, testing, and production. For example, use a rate-limited credential in the development environment for debugging, and a paid credential with stable performance and a sufficient quota in the production environment to ensure service quality.
* **Cost Optimization**: Add and switch between multiple credentials from different accounts or model providers to maximize the use of free or low-cost quotas, thereby reducing application development and operational costs.
* **Model Testing**: During model fine-tuning or iteration, you may create multiple model versions. By adding credentials for these different versions, you can quickly switch between them to test and evaluate their performance.
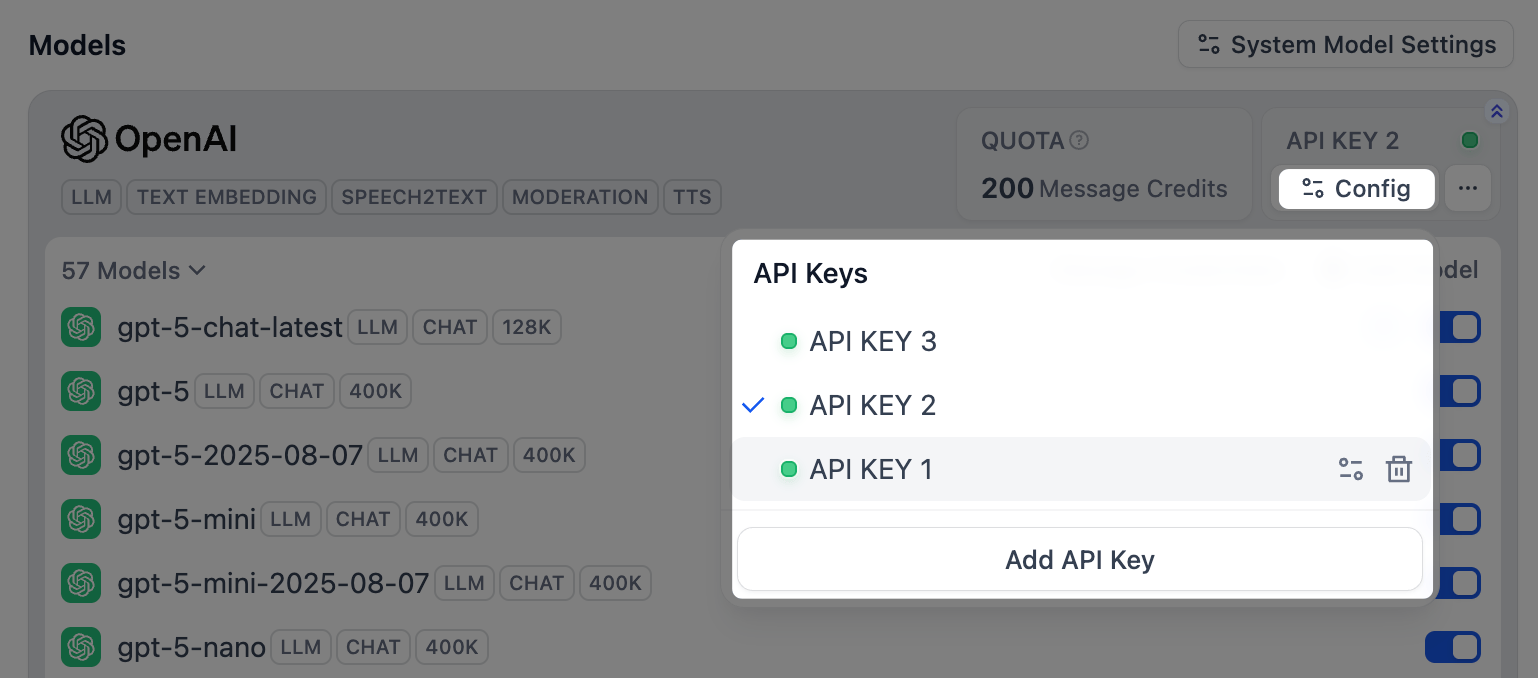
After installing a model provider and configuring the first credential, click **Config** in the upper-right corner to perform the following actions:
* Add a new credential
* Select a credential as the default for all predefined models
* Edit a credential
* Delete a credential
If the default credential is deleted, you must manually specify a new one.
 ### Manage Credentials for a Single Custom Model
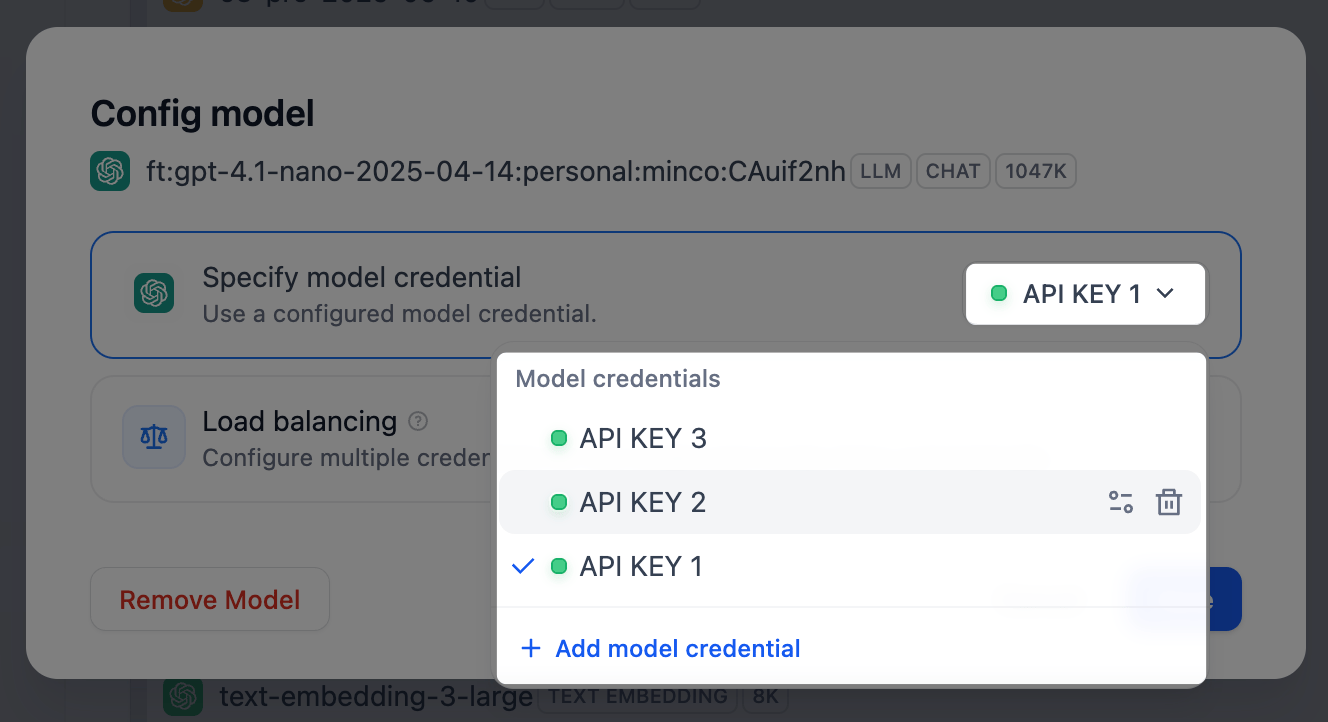
After installing a model provider and adding a custom model, follow these steps:
1. In the model list, click the corresponding **Config**.
2. In the **Specify model credential** panel, click the default credential to open the credential list, then perform the following actions:
* Add a new credential
* Select a credential as the default for that custom model
* Edit a credential
* Delete a credential
If you delete the only credential for a custom model, the model will also be deleted.
### Manage Credentials for a Single Custom Model
After installing a model provider and adding a custom model, follow these steps:
1. In the model list, click the corresponding **Config**.
2. In the **Specify model credential** panel, click the default credential to open the credential list, then perform the following actions:
* Add a new credential
* Select a credential as the default for that custom model
* Edit a credential
* Delete a credential
If you delete the only credential for a custom model, the model will also be deleted.
 When you add a new custom model with a name and type identical to an existing custom model, the system will add the new credential to that existing model rather than creating a duplicate.
### Manage Credentials for All Custom Models
Click **Manage Credentials** to view, edit, or delete the credentials for all custom models.
When you add a new custom model with a name and type identical to an existing custom model, the system will add the new credential to that existing model rather than creating a duplicate.
### Manage Credentials for All Custom Models
Click **Manage Credentials** to view, edit, or delete the credentials for all custom models.
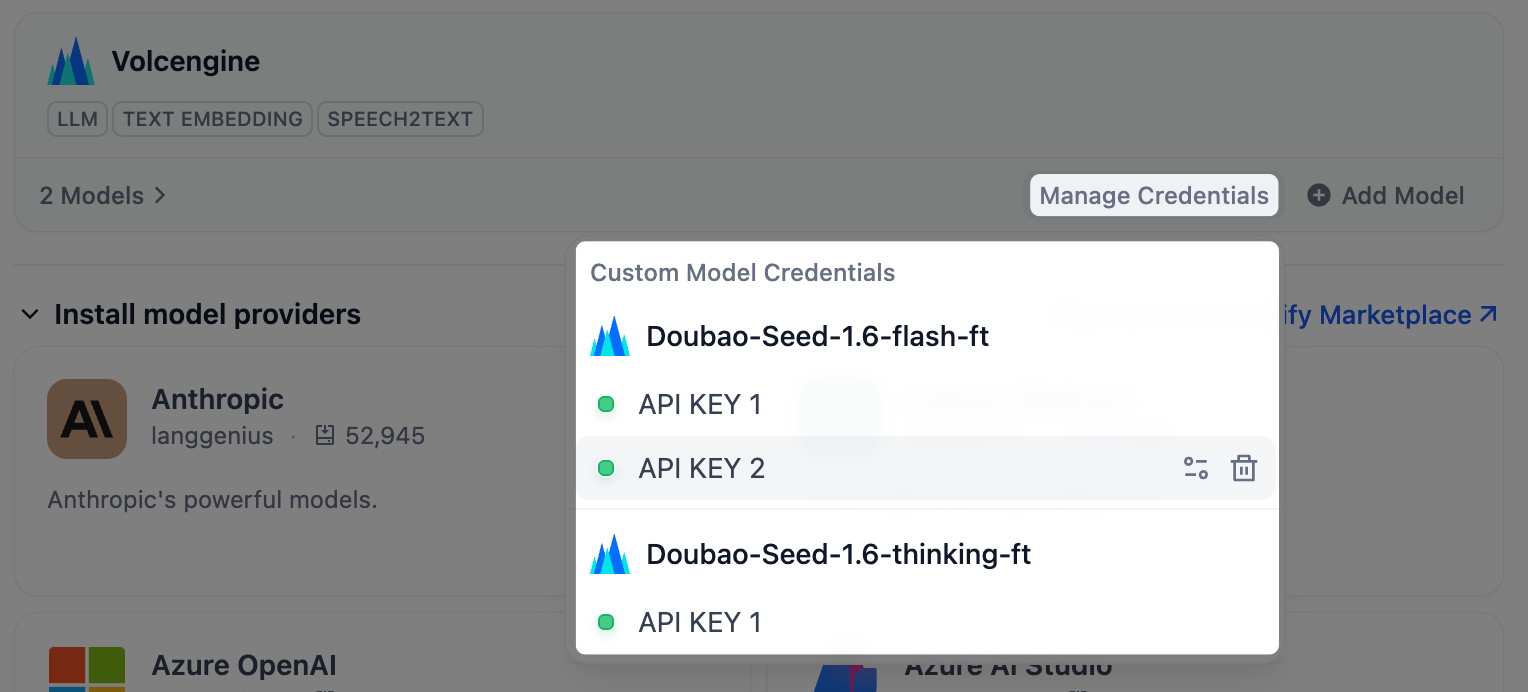 After a custom model is removed, its credentials will remain in the **Manage Credentials** list. When you click **Add Model**, the system will display all removed custom models whose credentials still exist, allowing you to quickly re-add them.
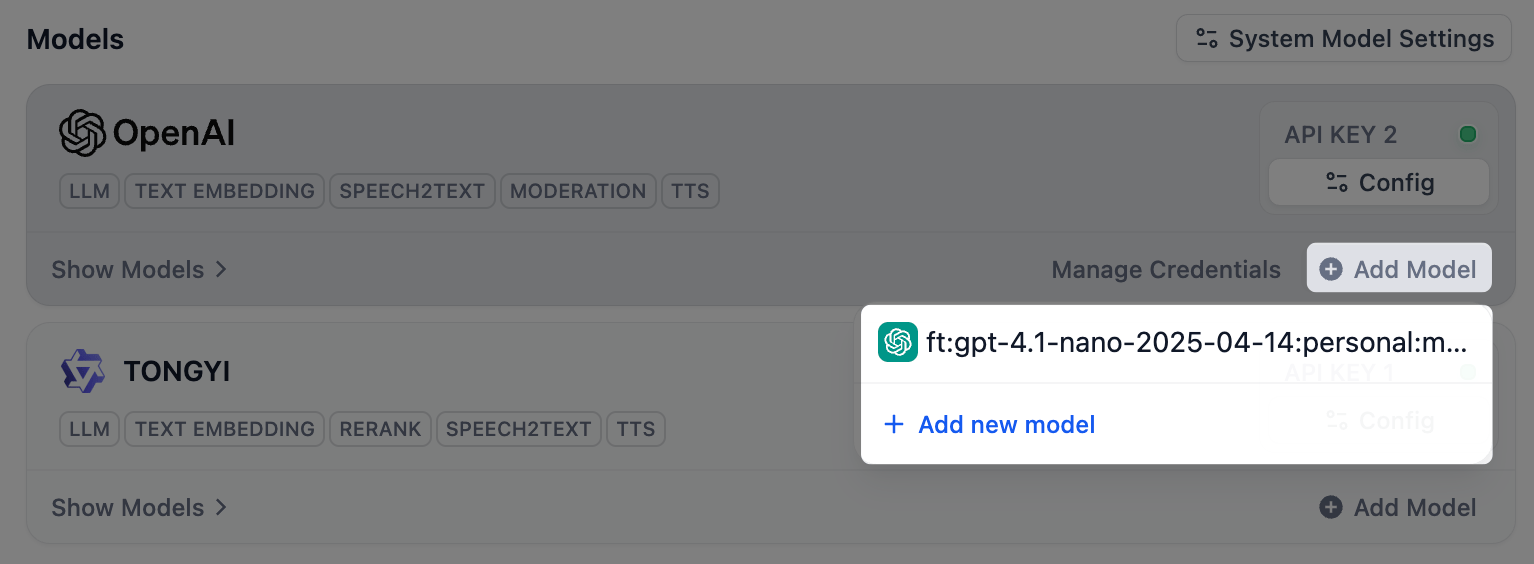 If you delete all credentials for a removed custom model from the **Manage Credentials** list, that model will no longer appear when you click **Add Model**.
## Load Balancing
When a model provider has multiple credentials, you can distribute requests across them automatically. Load balancing spreads traffic so no single credential hits its rate limit, which helps maintain throughput under heavy use.
By default, Dify uses a round-robin strategy, routing each request to the next credential in the pool. If a credential triggers a rate limit, it is taken out of rotation for one minute before Dify retries it.
To set it up:
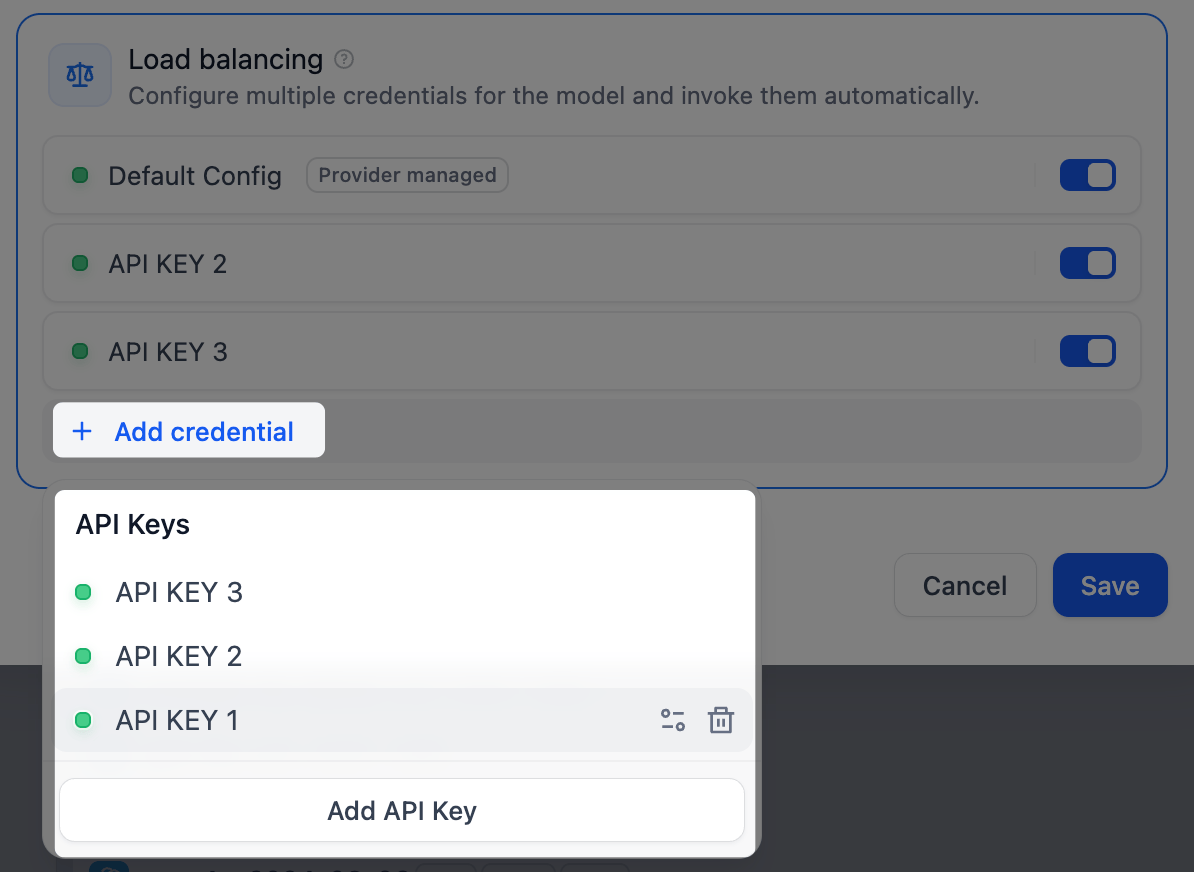
1. In the model list, find the model, open its **Config** options, and choose **Load Balancing**.
2. Add credentials to the load balancing pool, either by selecting existing credentials or adding new ones.
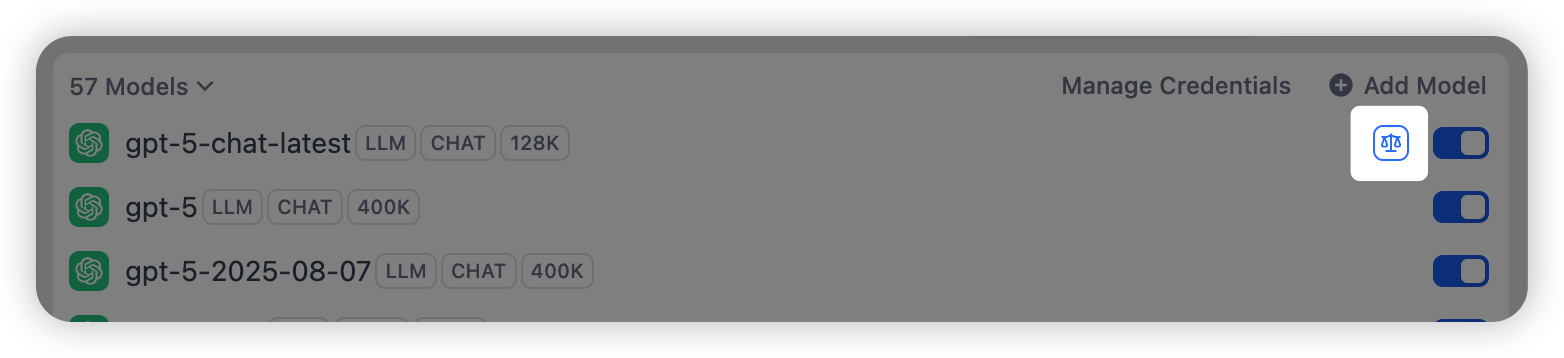
3. Enable at least two credentials, then click **Save**. Models using load balancing are marked with a dedicated icon.
If you delete all credentials for a removed custom model from the **Manage Credentials** list, that model will no longer appear when you click **Add Model**.
## Load Balancing
When a model provider has multiple credentials, you can distribute requests across them automatically. Load balancing spreads traffic so no single credential hits its rate limit, which helps maintain throughput under heavy use.
By default, Dify uses a round-robin strategy, routing each request to the next credential in the pool. If a credential triggers a rate limit, it is taken out of rotation for one minute before Dify retries it.
To set it up:
1. In the model list, find the model, open its **Config** options, and choose **Load Balancing**.
2. Add credentials to the load balancing pool, either by selecting existing credentials or adding new ones.
3. Enable at least two credentials, then click **Save**. Models using load balancing are marked with a dedicated icon.
 ## Access and Permissions
Team access follows workspace permissions:
* **Owners/Admins** can configure, modify, and remove providers
* **Editors/Members** can view available providers and use them in applications
API keys grant workspace-wide model access and trigger direct billing through each provider's account. Only give admin privileges to trusted team members.
## Troubleshooting
**Authentication Failed**: Verify API key accuracy, check expiration, ensure sufficient credits, confirm key permissions.
**Model Not Available**: Check provider configuration includes the model, verify API key tier access, refresh provider settings.
**Rate Limits**: Upgrade provider account, implement request queuing, consider custom providers for higher limits.
## Access and Permissions
Team access follows workspace permissions:
* **Owners/Admins** can configure, modify, and remove providers
* **Editors/Members** can view available providers and use them in applications
API keys grant workspace-wide model access and trigger direct billing through each provider's account. Only give admin privileges to trusted team members.
## Troubleshooting
**Authentication Failed**: Verify API key accuracy, check expiration, ensure sufficient credits, confirm key permissions.
**Model Not Available**: Check provider configuration includes the model, verify API key tier access, refresh provider settings.
**Rate Limits**: Upgrade provider account, implement request queuing, consider custom providers for higher limits.